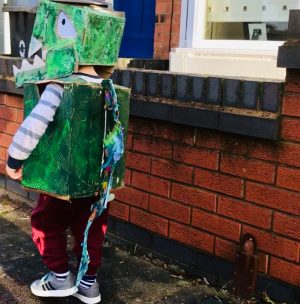
How do you while away a lazy Sunday? Using your gifted Bostik crafts kit to turn cardboard boxes into Dinosaurs, obvs! Possibly more obvious if you’ve two under three year olds and a copious amount of cardboard boxes still left over from moving day. Still a pretty normal Sunday for our house!
Theme
Why cardboard dinosaurs? Well, this month marks the end of a year, being one of Bostik UK’s Crafts Ambassadors. Every month or so they’ve gifted us with adhesives and crafts supplies in order to complete various crafts challenges, they’ve set. This month the theme was ‘Dinosaurs’. Which had Theon dancing with delight! And for our last month of the year we really wanted to go big. So, we took inspiration from some of the STEAM projects the boys did, earlier in the year.
Supplies
To make your own cardboard box dinosaur you will need:
• A box for the head
• A box for the body
• Bostik Blu Stick
• Bostik PVA glue
• Paints and/or coloured tissue paper
• Masking tape
• Scissors
• Pencil
• Anything bright, shiny and colourful to add extra detail; we used coloured feathers and small, pre-cut, gold foil circles
Step By Step
Although a pretty easy project to complete, there are quite a few steps to follow. So, instead of writing you a long essay to track we’ve put together a ‘How To’ video on our IGTV channel:
Body
For your cardboard Dinosaur body you will need:
• A cardboard box, big enough to fit your child’s torso
• Paints and/or coloured tissue paper to decorate
• A pencil
• Scissors
• Bostik PVA glue
• Masking tape
• Green Paint

Step one
close up your box using masking tape
Step two
Stand it up long ways; so that it is stood up tall
Step three
Cut out the bottom of your box and keep the discarded pieces, we will use them for the tail
Step four
Using the pencil draw a circular shape in the centre of the top of the box, (it needs to be big enough for your child’s head to fit through) and cut out
Step five
Very similar to step four but at the top centre of both sides of the box draw and cut out two more circles, this time big enough for their arms to fit through
Step six
Use a mix of Bostik PVA glue with green paint to decorate the dinosaur’s torso. The glue combined with the paint will help to create a textured effect. Alternatively use the PVA to decorate and colour the box with tissue paper
Tail

Take the left over pieces of cardboard you have and line them up long ways. Use the masking tape to connect them altogether. You should now have made one long piece of card. This will now create your cardboard dinosaur tail. Through the middle cut out a zigzag pattern to mimic scales and spikes.
Now paint and decorate it in whatever colours and materials you fancy. Although, a lot of this project is for completion by older kids or adults, this part is where you can let smaller kids go all out. Maybe even use it to keep them distracted whilst you complete the body and head. It will also make them feel involved and a part of the process.
Go wild creatosaurus’ or is that creatosauri?!
Much love,
Berrit x
I wish I had known about this when I was working as a registered child minder, the children would have loved it #kidsandkreativity@_karendenbis199@gmail is
It’s such a cute, fun thing to donisnt it and a great way to recycle!
That’s a fabulous cardboard box dinosaur and what a fun way to use up cardboard boxes. We once made a dinosaur head with papier mâché but yours looks much better and a bit simpler to make! #KidsandKreativity
Yep far less messy!
Great use of old cardboard boxes and such a fun project for kids. Fab! #kidsandkreativity
The kids find them hilarious and the cardboard is really hard wearing!
Such a cool dinosaur! I love it, my littel boy would love making this! Thanks for linking up with #KidsandKreativity, hope to see you back next time x
Dinos are always a win aren’t they!?